Lab Exercise
1. Virtualization with qemu-kvm
2. Understading qemu-kvm
3. Creating VM with virtual interface TAP
4. Creating Linux Bridges with virtual interface TAP
ATTENTION: Replace where yourlogin by uXXXvnet1. Virtualization with qemu-kvm
1. Virtualization with qemu-kvm.- QEMU is a emulator.
- KVM is Kernel with extension to virtualization, using virtualization hardware "Intel VT-x and AMD-V".
First you do have a flag in your CPU:
| $ egrep "(vmx|svm)" /proc/cpuinfo |
Second you do need enable the module kernel:
modprobe kvm
modprobe kvm_intel ou kvm_amd
To see:
| $ lsmod | grep kvm |
More about: http://wiki.qemu.org/KVM
2. Understading qemu-kvm.
The qemu-kvm has 3 output:- Display of your virtual machine.
| $ qemu-kvm
-vnc |
but in our lab we are going to use display none.
| $ qemu-kvm -display none |
- Monitor of your virtual machine.
| $ qemu-kvm -monitor stdio -display none |
| (qemu) info
kvm ... (qemu) info status ... (qemu) stop (qemu) info status ... (qemu) quit |
More monitor commands: https://en.wikibooks.org/wiki/QEMU/Monitor
We can add this monitor in socket TCP.
| $ qemu-kvm -chardev socket,id=tcpmon0,port=5000,host=localhost,server,nowait -monitor chardev=tcpmon0 & |
* Replace the number port 5000 for your number port 5XXX
To access the monitor in socket TCP.
| $ nc
localhost (qemu) quit |
Serial of your virtual machine.
| $ cp /vms/vm.img disk-vm.img |
And start it with 128MB memory, disk disk-vm.img and serial default output.
| $ qemu-kvm -m
128 \ -drive file=disk-vm.img \ -serial stdio \ -display none |
Waiting your machine start.
Login in your VM with user and password:
passord: cubswin:) $ free -m $ sudo poweroff |
3. Creating VM with virtual interface TAP.
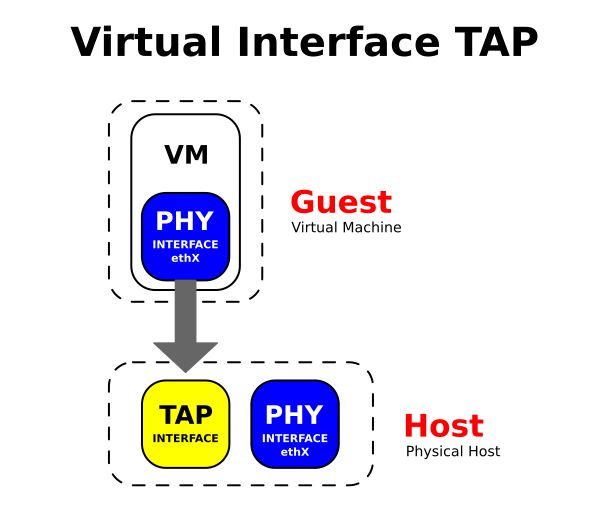
a ) Create interface TAP
| $ sudo ip tuntap add yourlogin-tap0 mode tap |
b ) Enable the interface
| $ sudo ip link set yourlogin-tap0 up |
c ) Setting a static IP address in your interface tap
| $ sudo ip addr add 192.168.10.1/24 dev yourlogin-tap0 |
To verify the IP address configuration of yourlogin-tap0, you can use the ifconfig command in the following manner.
| $ ifconfig yourlogin-tap0 |
d ) Copy the disk for your VM
| $
cp /vms/vm.img . |
e ) Start your VM with qemu-kvm
| $
qemu-kvm -m 128 -drive file=vm.img \ -netdev type=tap,ifname=yourlogin-tap0,id=net0,script=no \ -device virtio-net-pci,netdev=net0,mac=aa:00:00:11:76:f0 \ -serial stdio -display none |
* You are waiting your VM begin.
f ) After your VM start. You are going to need login.
| user:
cirros password: cubswin:) |
e ) Now you are setting a static IP address on interface eth0 of VM
| $
sudo ip link set eth0 up $ sudo ip addr add 192.168.10.2/24 dev eth0 |
To verify the connection between VM and Host with interface yourlogin-tap0
| $ ping -c 5 192.168.10.1 |
** Now you can shutdown your VM: $ sudo poweroff
4. Creating Linux Bridges with virtual interface TAP.

a ) Create 2 interfaces TAP, being a for VM1 and another to VM2.
| $
sudo ip tuntap add yourlogin-vm1-tap mode tap $ sudo ip tuntap add yourlogin-vm2-tap mode tap |
b ) Now we should start the interfaces.
| $
sudo ip link set yourlogin-vm1-tap up $ sudo ip link set yourlogin-vm2-tap up |
c ) For to create a bridge Linux and include the interface it.
| $
sudo brctl addbr yourlogin-br0 $ sudo brctl addif yourlogin-br0 yourlogin-vm1-tap $ sudo brctl addif yourlogin-br0 yourlogin-vm2-tap |
d ) Now we should start the bridge.
| $ sudo ip link set yourlogin-br0 up |
e ) For to show the bridge, use the command
| $ sudo brctl show |
f ) Now you can enable two SSH session and start in each VM with your interface.
* Session 1
| $
cp /vms/vm.img vm1.img $ qemu-kvm -m 128 -drive file=vm1.img \ -netdev type=tap,ifname=yourlogin-vm1-tap,id=net0,script=no \ -device virtio-net-pci,netdev=net0,mac=aa:00:00:11:76:f1 \ -serial stdio -display none |
* Session 2
| $
cp /vms/vm.img vm2.img $ qemu-kvm -m 128 -drive file=vm2.img \ -netdev type=tap,ifname=yourlogin-vm2-tap,id=net0,script=no \ -device virtio-net-pci,netdev=net0,mac=aa:00:00:11:76:f2 \ -serial stdio -display none |
g ) Set the IP address in each of the VMs.
* Session 1
| user:
cirros password: cubswin:) $ sudo ip link set eth0 up $ sudo ip addr add 10.2.3.1/24 dev eth0 |
* Session 2
| user:
cirros password: cubswin:) $ sudo ip link set eth0 up $ sudo ip addr add 10.2.3.2/24 dev eth0 |
h ) To test you can use the command PING
* Session 1
| $ ping -c 5 10.2.3.2 |